Getting Started with How to Draw a Door
- Before learning how to draw a door, it’s essential to grasp the fundamentals of drawing in CAD.
Essential Tools for Drawing a Door
- You’ll need the right tools and software to draw a door successfully in plan view, such as AutoCAD. Please familiarize yourself with the key commands listed below.
AutoCAD Commands We Will Be Using to Draw the Door
- LINE Command: Used to draw straight lines, crucial for outlining walls and door edges.
- MOVE Command: Allows you to reposition drawn elements, used for adjusting the door’s location.
- TRIM Command (TR): Used to remove unnecessary parts of wall lines. A quick way to create door openings.
- RECTANGLE Command (REC): Helps in drawing rectangular shapes, used for both the door and its elevation.
- ARC (A): Creates a door swing using the Center option. The Center will be the door’s hinge point
- OFFSET Command (O): Creates parallel lines at a specified distance, useful for adding door trims.
- BLOCKMAKE Command (BM): Creates reusable block elements, and streamlines the door replication process for adding more doors in your drawing
- OBJECT SNAP (OS) and OBJECT SNAP TRACKING: For precision in snapping to specific points and tracking along alignments.
Preparing the Canvas for Your Door Drawing
- Begin by setting up your drawing. Activate object snaps (OS) for precision to make things accurate as you draw a door. In AutoCAD, snapping is done by hovering over a point until the cursor changes shape, indicating that the snap is active. For example, a Square shape suggests an end point. Simply left-click to snap to this point.
- Another important setting to check is DYNMODE (Dynamic Input Setting). Type this into the Command Line and set it to 3.
Determining Your Door’s Position
- The placement of the door you draw is important. Consider the door jam clearance and orientation of the door swing. Below you will find how to position and draw your door using various AutoCAD Commands.
Step-by-Step Instructions to Draw a Door
- Let’s start drawing. First, you’ll need to draw the wall where the door will be located. Use the LINE command to draw a wall line perpendicular to the wall itself (in our case its 3-1/2″), then the MOVE command to position your door.
Creating the Door Opening
- To create a door opening in your plan, use the TRIM command (TR), which effectively removes specific segments of lines or shapes, allowing for the precise formation of the door space within the wall.
Draw the Actual Door (W x H)
- For the door itself, use the RECTANGLE command (REC). Remember to set ‘DYNMODE’ to 3 for dynamic inputs. This will help you input the exact dimensions as you draw a door. These boxes are called Tooltips. You can Tab into them and type the required distance you need.
- In our example, we use an X distance of 1-1/2 inches (the width) and a Y distance of 3 feet (the height).
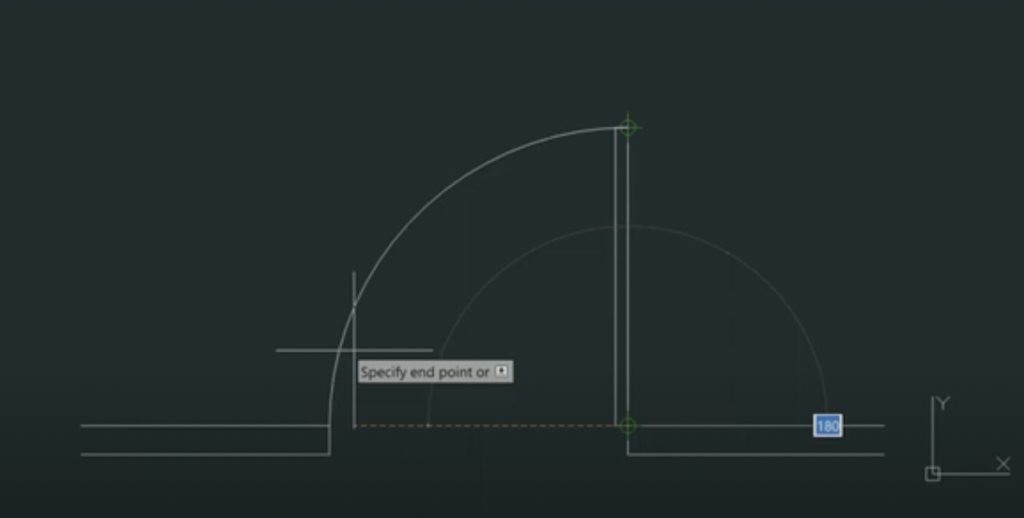
- To draw the door swing we use the Arc Command (A) and then C (Enter) to draw the arc from it’s center. We snap to the points on the door starting with the center (at the hinge point) and the arc start point at the opposite end of the door.
- Lastly, we snap to the opposite side of the opening to locate the end of Arc.
See this door routine, which creates single and double doors, swings, and breaks the wall.
Create a matching Door Drawing in Elevation
- After drawing the door in plan view, add an elevation of the same door. Use the RECTANGLE command (REC) again, drawing the door’s elevation. Use Dynamic Input to speed things up.
Door Elevation Techniques
- Elevate your door drawing so that it aligns with the plan view drawing. For this utilize ‘OBJECT SNAP TRACKING’ to ensure your elevation lines up accurately.
Finalizing and Reviewing Your Door Drawing
- You can add door swings using the LINE command (L) and then changing the Linetype in the Properties Dialog (activate it using CTRL 1)
- To finalize your drawing, you can use the OFFSET command (O) to create the door trim, to create more detail.
Quality Check
- Inspect each part of your drawing to make sure all lines meet properly. You should also check the dimensions match what you need. Tip: One way to check the lengths of objects is to hover over a Grip.
Take it a step further: Using Blocks
- Consider using blocks in CAD to reproduce the door you’ve drawn. This will streamline the process in larger projects and consider building a library of doors for future projects.
Mastering Blocks in Door Design
- Creating blocks is simple. Use the BLOCKMAKE command (BM) to create a reusable component of the door you’ve drawn, saving time in future projects.
Perfecting the process of Drawing a Door
- Learning how to draw a door may take a little practice. But it’s not rocket science!
- Learn Command Shortcuts rather than menus and dialogs – eventually, you will memorize them after a few times.
- Tip: Master the rectangle command first. You will be surprised how it can be used for almost any straight object.
- Zoom in on your work regularly to check details, making sure every part of your door drawing is precise and accurate as you go.

