First, we start with a Windows Search.
Open File Explorer (shortcut: Ctrl + E) and select “This PC.” In the search box, Enter “acad.pat” and hit Enter. This will allow you to find your AutoCAD hatch files.
Pinpointing the File Location: The search will display all the .pat files. Right-click and select ‘Open File Location’ to identify where your AutoCAD hatch patterns are stored.
Copy the Hatch File Path: In the folder, right-click to copy the address. You will use this below to define the hatch pattern location into your AutoCAD Options settings.
The path to your hatch pattern definitions can also be found in the Support folder in AutoCAD. In this path there is a acad.pat file.
A problem may arise when you have multiple AutoCAD installations and/or more than one .pat file. Here’s a quick tip on how to locate your AutoCAD Hatch Patterns and set the path.
Do you still have problems locating the files? PAT files are also in program files under the “your Program Files / Autocad-Version support” folder.
Typical AutoCAD Hatch File Paths:
Typical locations are where %USERNAME% is your name and xx.x is the version. These will vary depending on your machine and version of AutoCAD.
Standard AutoCAD:
C:\Users\%USERNAME%\AppData\Roaming\Autodesk\AutoCAD 20xx\Rxx.x\enu\Support\acad.pat
AutoCAD LT Version:
C:\Users\%USERNAME%\AppData\Roaming\Autodesk\AutoCAD LT 20xx\Rxx.x\enu\Support\acadlt.pat
Remember to replace %USERNAME%, 20xx, and Rxx.x with your specific user and AutoCAD details.
C:\Users\%USERNAME%\AppData\Roaming\Autodesk\AutoCAD LT 20xx\Rxx.x\enu\Support\acadlt.pat
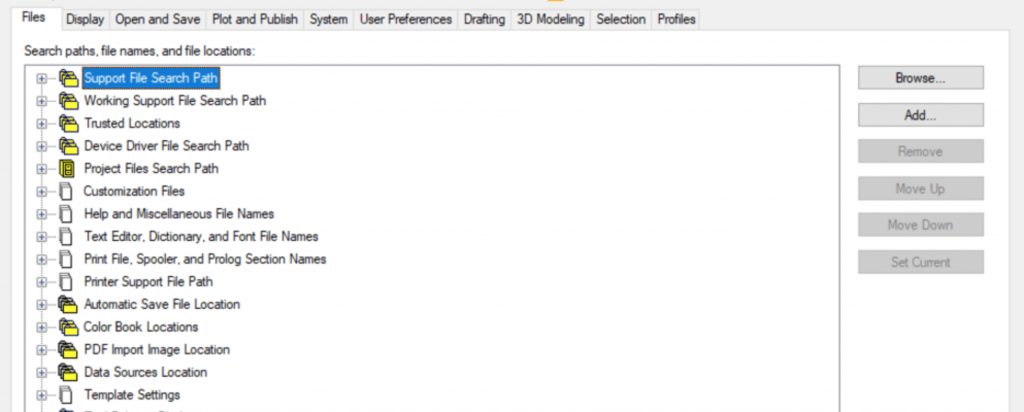
Adding Hatch Paths To Options Dialog
Access The Options Dialog: Type ‘OP’ in the AutoCAD command, opening the Options for hatch file configuration.
Locate Support File Search Path: Navigate to the “Support File Search Path” tab, which is essential for hatch pattern integration.
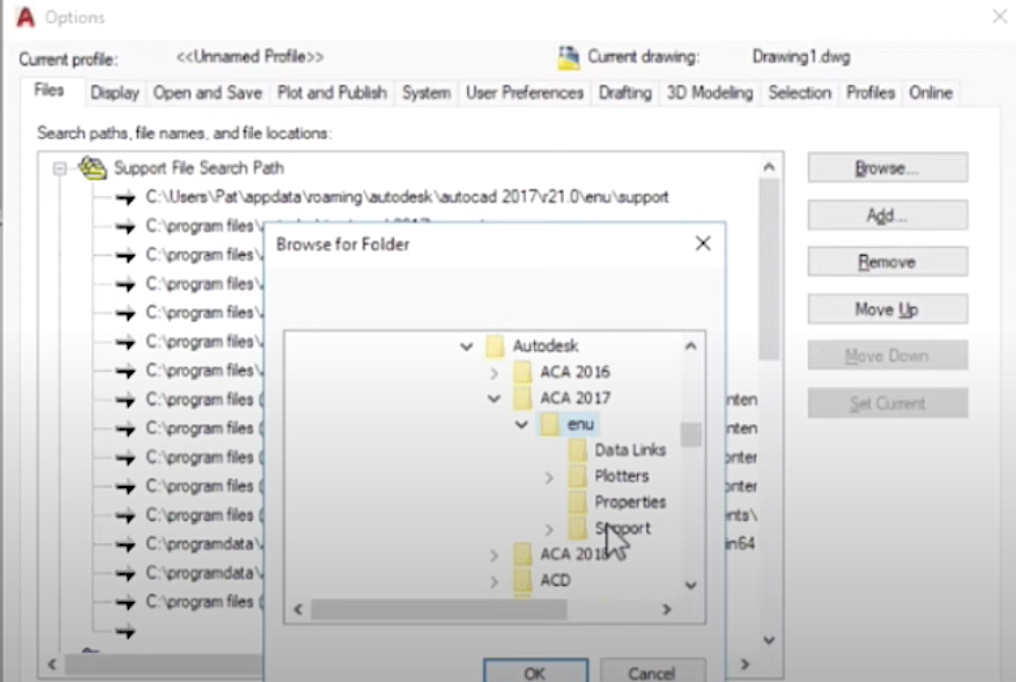
Apply the PAT File Location: Use ‘Add’ and ‘Browse’ to select the previously copied folder. This directs AutoCAD to your specific hatch patterns.
Prioritizing Your Hatch Patterns: Move your newly added path to the top of the list, ensuring AutoCAD prioritizes these hatch patterns.
Applying and Saving Settings: Click ‘Apply’ and then ‘OK’ to finalize the integration of your AutoCAD hatch patterns.
Test your Hatch Pattern Install
Test the path by typing the HATCH command. If the hatches still don’t show correctly, restart AutoCAD and test again. Also, recheck the path location.
If you make any changes to the Hatch codes within AutoCAD will be stored, you must always use this location when making modifications or adding new Hatch Patterns to avoid any conflicts or errors later down the line.
Troubleshooting Path Issues: If issues arise, revisit the Support File Search Path to verify the correct hatch file placement.
Special Instructions for Older AutoCAD Versions
In some older versions, hatch patterns may be in ‘UserDataCache’, a hidden folder. To view such folders in Windows, go to File Explorer’s ‘View’ tab and enable ‘Hidden items’.
Locating The UserDataCache folder.
The UserDataCache is a hidden folder and cannot be seen without changing your settings.
1. Open File Explorer (Windows+E)
2. Click on the View tab in the File Explorer window.
3. Check the box next to “Hidden items” in the Show/hide section of the ribbon.
4. Hidden folders and files will now be visible in File Explorer.
Once you find the acad.pat (or acadlt.pat), note the path described above and add it to your path. Type OP for options, then move to the top to prioritize and move to the top of the list as explained above.
Four Common Mistakes When Installing AutoCAD Hatch Patterns
Integrating hatch patterns into AutoCAD can significantly enhance your design capabilities, but certain pitfalls can complicate the process. Being aware of these common mistakes can save time and frustration.
1) Incorrect File Path in AutoCAD Settings
A mistake error is placing the .pat file in the wrong directory or inputting an incorrect file path in AutoCAD’s settings. This mistake prevents AutoCAD from locating and displaying the new hatch patterns. Always double-check that the file path in the ‘Support File Search Path’ matches the location of your .pat file, with no misspellings or added spaces.
2) Multiple Versions of AutoCAD and Multiple Hatch Files
When multiple versions of AutoCAD are installed, the .pat files for each version can be different. It’s easy to confuse the wrong folder, leading to hatch patterns not showing up. Have a careful look at the parent folders to find clues as to if you have older CAD versions installed.
3) Locating Hidden Folders Where Hatches May Reside
In some versions of AutoCAD, hatch patterns are stored in hidden folders, such as ‘UserDataCache’. A common issue is not being able to locate these folders due to their hidden status. To access them, make sure to enable the visibility of hidden folders in your file explorer settings.
4) Hatch Path Not High Enough on Path List in Options Menu
If the path to your hatch file isn’t prioritized in AutoCAD’s ‘Support File Search Path’, AutoCAD might not use your desired hatch patterns. The solution is to ensure that your hatch file’s path is high enough, preferably at the top of the list in the AutoCAD options menu. This prioritization helps AutoCAD locate and use your specified hatch patterns as undesired .pat files may be located in other AutoCAD folders.
Check Out Our Wood and Stone AutoCAD Hatch Pattern Collection
For more about the hatch patterns we offer, browse our collection of Wood and Stone AutoCAD Hatch Patterns and watch our instructional YouTube video to see how easy it is to install our AutoCAD hatch .PAT collection.
4 Step Process when Installing Our Hatch Patterns
The process below uses our AutoCAD Hatch Patterns as an example – this works for either a PC or a Mac.
1) Create a hatch pattern folder in your documents folder
2) Unzip your hatch patterns, extract or drag the files into a folder created in Step 1
3) Type OP for Options to see the Support File Search Path
3) Add and Browse to the exact path to the folder you created in Step 1 and Choose Ok
4) Move the path to the top of the Options list and Choose Apply
We can also help you install these patterns if needed.